Welcome back to Trailer Tech. We’ve all experienced jarring suspension and dangerous bumping at some point in our lives, so today we’re taking a look at the role shock absorbers play in improving the ride quality, handling, braking, and stability of your trailer. Trailers encounter the same road imperfections that cars do and, without damping, can pass them on to the cargo and the tow vehicle in the form of front to back chucking, side to side swaying, wheel hop, vibration, bouncing, bucking and jolting.

The bumps one feels while travelling down the road have a certain unbalanced cadence that can be measured and reported as a frequency. Suspension systems and dampers work together to absorb these imperfections and provide a smooth and safe ride. While suspension systems absorb imperfections in the road, they are only storing the kinetic energy in the form of suspension movement. Shock absorbers are a type of damper that absorb the kinetic energy from the spring and then dissipate that energy. Shock absorbers have to cope with road conditions that can both impact and oscillate the suspension.

The type of shock absorber used varies based on the type of trailer suspension since different types handle shock differently. For example, the friction between the leaves in leaf spring suspension provides some damping which results in little low frequency oscillation which is good. However, if the road conditions get severe, leaf springs struggle to provide good ride quality as bumps that produce excessive suspension movement also result in a jarring and bumpy ride. Depending on design and loading conditions, leaf spring suspension can also suffer from high frequency vibrations. As a comparison, torsion axles tend to provide good absorption of severe bumps and vibrations but can settle into an oscillating rhythm without proper damping. These are just a couple of situations that highlight the importance of selecting the type of shock absorber best suited to your application.
Now, let’s take a look at the shock absorber and damping options commonly available for trailer suspension and where they provide the most improvement.
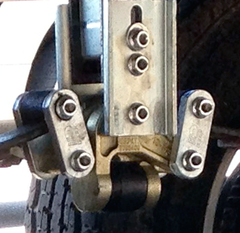 Leaf spring suspensions can benefit from rubber bump stops or rubber springs. Bump stops will simply prevent the axle and suspension from impacting the frame, providing severe shock absorption while rubber springs can help support the trailer’s load and provide bump stop and damping functionality. Bump stops and rubber springs are generally mounted to the trailer’s frame directly above the axle. Tandem axle and triple axle leaf spring suspensions benefit from rubberized equalizers which absorb severe bumps and high frequency vibrations, improve ride quality and braking and reduce chucking. These equalizers generally replace the standard solid equalizer and offer quick bolt-on installation. Air bag versions of the rubberized equalizer also exist generally offering more sophistication and tuning capability.
 All suspension systems benefit from the use of hydraulic tube shock absorbers to control suspension oscillation. Trailers specifically suffering from oscillation such as those equipped with torsion axles or anyone wishing to improve their trailer's handling characteristics achieve the most noticeable results from this type of damping system. Controlling oscillation improves vehicle ride quality, stability, control and handling. Choosing the right amount of damping is important as too much will cause the trailer to bump and jolt while not enough provides no improvement. For this reason, hydraulic shock absorbers are set-to and sold-by a specific weight range.
Mounting of hydraulic tube shocks may not be straightforward as both the angle and position of the shock absorber is important. For example: in leaf spring suspension, the tube style hydraulic shock absorber should be mounted as close to the wheel it is controlling as possible and on the side of the axle closest to the spring shackles to absorb the most movement. It can be mounted vertically to absorb suspension movement alone, angled back not more than 20 degrees if absorbing braking forces is also required or inward not more than 20 degrees if absorbing body roll is required. This varies from torsion axles' need to control oscillation where, dependent on space restrictions, the mounting location could be on a 5 to 25 degree angle in front of the axle connected to a bracket on the swing arm or vertically at the end of the swing arm. In any case custom mounts may need to be fabricated on the axle/suspension and trailer frame.
It is important to remember that shock absorbers should not be used to modify spring rate to increase the carrying capacity of the trailer unless they are specifically designed to do so such as rubber springs and some air bag systems.
Hopefully, this has given you some insight into ways shock absorption technology can be used on your trailer. Always remember to evaluate the type of trailer suspension you have and the ride quality or handling issues you are experiencing before making a decision. Contact us with your shock absorption and Trailer Tech questions, we’re happy to help! Thanks for reading!


 Leaf spring suspensions can benefit from rubber bump stops or rubber springs. Bump stops will simply prevent the axle and suspension from impacting the frame, providing severe shock absorption while rubber springs can help support the trailer’s load and provide bump stop and damping functionality. Bump stops and rubber springs are generally mounted to the trailer’s frame directly above the axle. Tandem axle and triple axle leaf spring suspensions benefit from rubberized equalizers which absorb severe bumps and high frequency vibrations, improve ride quality and braking and reduce chucking. These equalizers generally replace the standard solid equalizer and offer quick bolt-on installation. Air bag versions of the rubberized equalizer also exist generally offering more sophistication and tuning capability.
 All suspension systems benefit from the use of hydraulic tube shock absorbers to control suspension oscillation. Trailers specifically suffering from oscillation such as those equipped with torsion axles or anyone wishing to improve their trailer's handling characteristics achieve the most noticeable results from this type of damping system. Controlling oscillation improves vehicle ride quality, stability, control and handling. Choosing the right amount of damping is important as too much will cause the trailer to bump and jolt while not enough provides no improvement. For this reason, hydraulic shock absorbers are set-to and sold-by a specific weight range.


